A component is an independent piece of the user interface(UI). Everything on the screen of a react application is a component. A component contains single or more than one web elements.
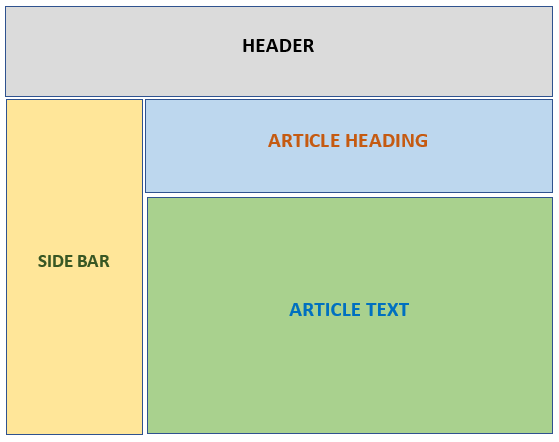
Example, below image shows the structure of a typical web page.

Each section in this page is a component. That is, there is a header component, a sidebar component, article header component, article text component, there may also be a footer component etc.
A component is responsible for rendering(or displaying) the elements contained in it. Elements can be displayed using JSX or using createElement method of React class as explained in the previous section.
Creating Component
Let’s further understand the concept of component by creating one. A component can be created in two ways in react.
1. As a javascript function
A component can be created using a simple javascript function. This function should contain the JSX code for creating elements that needs to rendered as a part of this component. Also, this function should return this JSX code.
Follow below steps for creating a component using this approach
A. Create a new file named website.js and write a function in it as shown
import React from 'react';

function website(){
    return(
        // component elements
        <div>
            <h1>codippa</h1>
            <p>Learning react</p>
        </div>
    );
}

export default website;
This makes a component with two elements, an h1 tag and a paragraph(p) tag.
Note that this file ends with an export keyword followed by the name of the function. This is required so that the code external to this file knows about this function.
If this is not done, then our website function will not be visible to the outside files and hence the component will not be rendered.
React.createElement function. This will be a lot complex as compared to JSX.B. Second step involves rendering the above component on the browser. This is done by using render method of React class.
Open index.js and attach the above component to the root element as shown below.
import React from 'react';
import ReactDom from 'react-dom';
import Website from 'website';

// attach component to the root element
ReactDom.render(<Website/>, document.getElementById('root'));
Since the component creation code is in a separate file, it needs to be imported into index.js using import keyword.
Syntax is
import functionname from filename;
File name should be enclosed within quotes and its path should be relative to the current file.
The name after import can be any name and it does not necessarily need to match the component name. That is, it can also be written as
import React from 'react';
import ReactDom from 'react-dom';
import Mycomponent from './website';

// attach component to the root element
ReactDom.render(<Mycomponent/>, document.getElementById('root'));
An important thing to remember is that the imported function name should start with a capital letter.
This is because react differentiates HTML elements and user defined components based on the first letter. If the first letter is lower case, then react will consider it as HTML element(which it is not) and you will see nothing on the screen but a message on the console as
Warning: The tag <website> is unrecognized in this browser. If you meant to render a React component, start its name with an uppercase letter.
It is also possible to put everything in a single file index.js as shown below.
import React from 'react';
import ReactDom from 'react-dom';

function Website(){
     return(
         <div>
             <h1>codippa</h1>
             <p>Learning react</p>
         </div>
     );
 }
// attach component to the root element
ReactDom.render(<Website/>, document.getElementById('root'));
But it is recommended to use separate files as it is easier to maintain and understand.
In the last section, we assigned the JSX code to a variable and then supplied the variable to the render method.
Here we are supplying the return value from the function(which is also a JSX code) to the render method.
2. As a class
This is another method of creating a component. Create a class which should be a child class of react’s inbuilt Component class from react module.
A child class is created by using extends keyword followed by the name of parent class.
Our component class should extend react’s class since it should inherit and define a function render which will contain the JSX code required for creating component elements.
Example,
import React, {Component} from 'react';

class Website extends Component {
    // define render method
    render(){
        return(
            // component elements
            <div>
                <h1>codippa</h1>
                <p>Learning react</p>
            </div>
        );
    }
}
export default Website;
In order to display this component, open index.js file, import the component class and attach the component name to the root element in the same way as in the previous approach.
Benefits of Component
Following are some advantages of using components in an application.
A component lets you isolate the HTML and element rendering logic making the application loosely coupled.
In the future, if we plan to change the display of our website component, then we can change it without other components knowing it.
Components enhance code reusability.
Suppose there is a component which displays current date. Now let’s say, we need to display the date at multiple places in our application.
Instead of repeating the date display code everywhere, we can simply import our date component.
Components make application maintenance much easier.
Let’s suppose we have used date component at 5 different places in our application.
Now we have to display the date in a different format than before. We only need to change our date component and the change will be reflected everywhere.
In a non-component based approach we would have to change it at 5 places.