In this article, we will have a look at caching support in Spring boot, how to configure it and use it to cache objects, update cache and remove objects from cache.
What is Caching
Caching means storing objects or data in a separate area. This area is called cache.
Cache can be a database, in-memory, a server depending on the implementation.
With Caching enabled, the application first looks for the required object in the cache instead of fetching it from the database or actual data store.
If it cannot find the object in cache, only then it accesses the database.
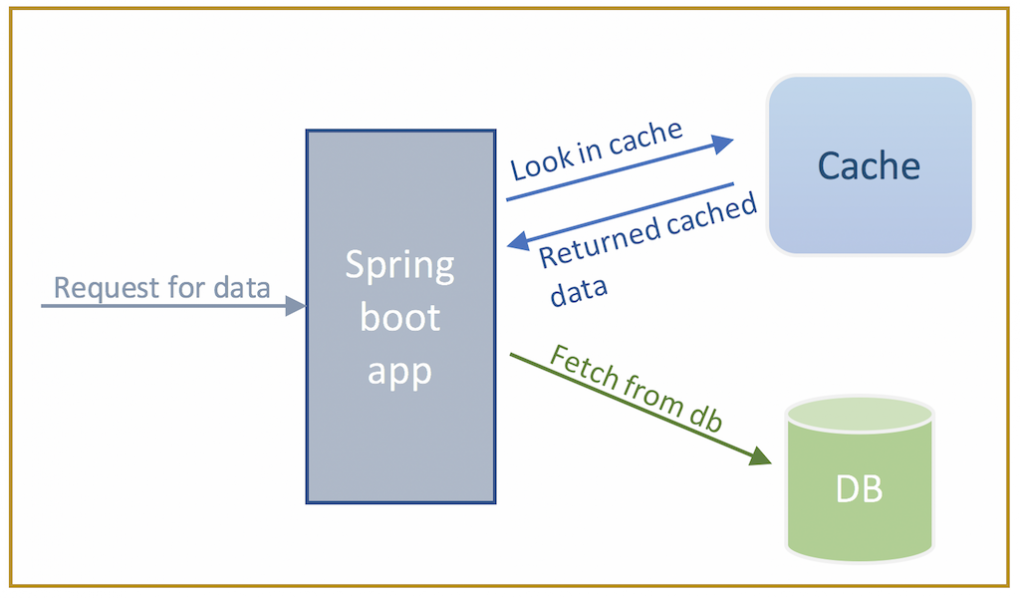
Caching is used to make data access faster since the object or data is fetched from the database only the first time when it is required. Subsequently, it is fetched from the cache and database is not accessed.
Thus, caching improves the performance of an application.
Spring Cache
Spring boot provides support for caching. You can use any of the external cache providers to cache objects.
Below is the control flow of a Spring boot application with caching enabled.
If Spring boot does not detect any of the cache providers, then it uses ConcurrentHashMap to store data.
Using the default cache provider is not recommended for production but it is fine to understand Spring boot caching.
Following are the cache providers supported by Spring boot caching
- JCache(EhCache 3, Hazelcast, Infinispan, and others)
- EhCache 2.x
- Hazelcast
- Infinispan
- Couchbase
- Redis
- Caffeine
- Simple
Separate configuration is required if any of these cache providers is used. This article will only cover default Spring boot caching support.
Spring cache configuration
For adding Sping boot caching support, you need to add the following dependency to the project. This will add the corresponding jars to the classpath.
Maven
<dependency>
    <groupId>org.springframework.boot</groupId>
    <artifactId>spring-boot-starter-cache</artifactId>
    <version>3.1.3</version>
</dependency>
Gradle
implementation 'org.springframework.boot:spring-boot-starter-cache:3.1.3'
Spring cache annotations
Following are the annotations that you need to add caching support to Spring boot application.
1. @EnableCaching
This annotation is used to inform Spring boot that we want to use caching in this application.
This annotation may be applied over Spring boot main class as shown below.
@SpringBootApplication
@ComponentScan("com.codippa")
@EnableCaching
public class CachingApplication {

  public static void main(String[] args) {
    SpringApplication.run(CachingApplication.class, args);
  }

}
Or it can also be applied over a Spring configuration class as below.
@Configuration
@EnableCaching
public class AppConfig {

}
If you are using the default CacheManager and you do not want to customize it, then there is no need to create a separate class to apply @EnableCaching.
Default Cache manager can be customized using a CacheManagerCustomizer bean as shown below.
In this case, you can create a separate @Configuration class and apply @EnableCaching there.
@Configuration
@EnableCaching
public class CacheConfigurer {
  @Bean
  public CacheManagerCustomizer<ConcurrentMapCacheManager> cacheManagerCustomizer() {
     return new CacheManagerCustomizer<ConcurrentMapCacheManager>() {
         @Override
         public void customize(ConcurrentMapCacheManager cacheManager) {
             cacheManager.setAllowNullValues(false);
         }
     };
  }
}
This code will not allow null values to be cached.
You can also create a class that implements CacheManagerCustomizer interface and implement its customize() method.
Thus, above code may also be replaced by
@Component
@EnableCaching
public class CacheCustomizer implements
CacheManagerCustomizer<ConcurrentMapCacheManager>{

  @Override
  public void customize(ConcurrentMapCacheManager cacheManager) {
    cacheManager.setAllowNullValues(false);
  }
}
BUT, all this is not required if you do not want any customizations. Simply add @EnableCaching over main class and you are good to go.
.
2. @Cacheable
After we have informed Spring that we need to support caching, we need to tell what objects we want to cache.
This is done by using @Cacheable annotation
This annotation is applied over a method and the return value of that method is automatically cached by Spring.
If it is applied over a class, then it adds caching behavior to all the methods of this class and the return values from all the methods are cached.
Example,
@Cacheable("posts")
public Post findById(Integer postId) {
  // fetch post from database
}
When a request to fetch a post arrives, Spring boot will look for it in the cache named “posts”.
If the post is found in cache, then this method will not be invoked and if not, this method will be called and the database will be accessed to fetch the post.
This also means that for the first time, this method will be invoked since the post would not be present in the cache.
Name of the cache is mandatory else the application will fail at runtime with a java IllegalStateException as below.
java.lang.IllegalStateException: No cache could be resolved for ‘Builder[public com.codippa.Post com.codippa.PostService.findById(java.lang.Integer)] caches=[] | key=” | keyGenerator=” | cacheManager=” | cacheResolver=” | condition=” | unless=” | sync=’false” using resolver ‘org.springframework.cache.interceptor.SimpleCacheResolver@93d905’. At least one cache should be provided per cache operation.
All objects are cached corresponding to a key. If not key is specified, then the method parameters are used to create a key.
This annotation has following attributes:
A. value
This attribute is used to specify the name of cache and is required when we are using other attributes otherwise, we can specify the name simply in parenthesis as in the previous example.
Multiple cache names can be supplied by using a String array as shown below.
@Cacheable(value={"posts", "postsbackup"})
B. key
This is the key with which objects will be cached. Spring Expression Language(SpEL) can be used to define a key as shown below.
@Cacheable(value="posts", key="#post.id")
public Post findById(Integer postId) {
}
In this example, id field or instance variable of Post object will be used as the key to cache Post objects.
C. keyGenerator
If key is not provided, then method parameters are used as keys and this is then managed by Spring.
If you want to define your own key generation mechanism, then you need to create your own key generator.
For this,
(i). Create a class that implements org.springframework.cache.interceptor.KeyGenerator interface and its generate() method.
(ii). Register it as a Spring bean as shown below.
@Component
public class CustomKeyGenerator implements KeyGenerator{

  @Override
  public Object generate(Object target, Method method, Object... params) {
    // key generation logic
  }

}
(iii). Now use it as keyGenerator value as
@Caching(value="posts", keyGenerator = "customKeyGenerator")
public Post findById(Integer postId) {
}
You cannot use key and keyGenerator attributes together. Doing so would be an error.
java.lang.IllegalStateException: Invalid cache annotation configuration on ‘public com.codippa.Post com.codippa.PostService.findById(java.lang.Integer)’. Both ‘key’ and ‘keyGenerator’ attributes have been set. These attributes are mutually exclusive:
C. cacheManager
Name of cache manager. Again this is only required when you want to use your own cache manager and do not want Spring’s default cache manager.
D. condition
This attribute is required for conditional caching and supports SpEL.
Suppose we want to cache only those Post objects whose id is greater than 10. We can do this by using condition attribute as shown below.
@Cacheable(value="posts", condition="#postId>10")
public Post findById(Integer postId) {
}
or
@Cacheable(value="posts", condition="#title.length > 20")
public Post findByTitle(String title) {
}
3. @CachePut
Cached objects are the copies of original objects in the database and should be identical to them. When original object changes, then cached object should also be updated.
This is done using @CachePut annotation and is applied over the method that performs update operation. Example,
@CachePut("posts")
public void updatePost(Post post){
 // update post object
}
@CachePut has same attributes as @Cacheable such as value, key, condition, etc., and they behave in the same way with respect to update operation.
4. @CacheEvict
This annotation is used to indicate a remove operation of the data from cache and is applied on the method that deletes object from the database as shown below.
@CacheEvict("posts")
public void deletePost(Integer postId) {
  // delete post object
}
Again, @CacheEvict has same attributes as @Cacheable such as value, key, condition, etc., and they behave in the same way with respect to delete operation.
5. @CacheConfig
If cache annotations on all the methods of a class share the same properties such as cache name, cache manager, etc., then instead of duplicating these values in all annotations, you can use @CacheConfig annotation.
This is used at class level and contains properties such as cacheNames, keyGenerator, cacheManager and cacheResolver. Example,
@Service
@CacheConfig(cacheNames="posts")
public class PostService {

 @Cacheable
 public Post findById(Integer postId) { }
}
Notice that now @Cacheable does not define a cache name, it is taken from @CacheConfig instead.
unless attribute
With Spring boot, we may choose to cache an object fetched from the database based on a condition.
With @CachePut, we have an unless property which tells Spring boot to cache the object only if it matches certain condition.
SpEL provides a context variable #result which refers to the object that is fetched when this method is called and you can apply a condition on its values.
Below method will cache the title only when it is more than 50 characters or unless the title is lesser than 50 characters.
@CachePut(value="titles", unless="#result.length() < 50")
public String getTitle(Post post) {
  // fetch post with given id
}
unless enables us to cache objects based on the output as opposed to condition which performs caching on the basis of input.
Remember that unless attribute is available only with @CachePut.
Spring Boot cache example
Below are the different classes that are required for a simple caching application using Spring boot.
Main class
package com.codippa;

import org.springframework.boot.SpringApplication;
import org.springframework.boot.autoconfigure.SpringBootApplication;
import org.springframework.cache.annotation.EnableCaching;
import org.springframework.context.annotation.ComponentScan;

@SpringBootApplication
@ComponentScan("com.codippa")
public class CachingApplication {

  public static void main(String[] args) {
    SpringApplication.run(CachingApplication.class, args);
  }

}
Post class
package com.codippa;

public class Post {

  private Integer postId;

  private String title;

  public Post(Integer postId, String title) {
    this.postId = postId;
    this.title = title;
  }

  public Integer getPostId() {
    return postId;
  }

  public void setPostId(Integer postId) {
    this.postId = postId;
  }

  public String getTitle() {
    return title;
  }

  public void setTitle(String title) {
    this.title = title;
  }


}
Controller class
package com.codippa;

import org.springframework.stereotype.Controller;
import org.springframework.web.bind.annotation.DeleteMapping;
import org.springframework.web.bind.annotation.GetMapping;
import org.springframework.web.bind.annotation.PathVariable;
import org.springframework.web.bind.annotation.PostMapping;
import org.springframework.web.bind.annotation.ResponseBody;
import org.springframework.beans.factory.annotation.Autowired;


@Controller
public class PostController {

  @Autowired
  PostService service;

  @GetMapping("/posts/{id}")
  public @ResponseBody Post findById(@PathVariable("id") Integer postId) {
    return service.findById(postId);
  }

  @PostMapping("/updatepost")
  public void updatePost(Post post) {
    service.updatePost(post);
  }

  @DeleteMapping("/posts/{id}")
  public void deleteById(@PathVariable("id") Integer postId) {
     service.deleteById(postId);
  }

}
Service class
import org.springframework.cache.annotation.CacheEvict;
import org.springframework.cache.annotation.CachePut;
import org.springframework.cache.annotation.Cacheable;
import org.springframework.stereotype.Service;

@Service
public class PostService {

   @Cacheable("posts")
   public Post findById(Integer postId) {
      System.out.println("#### Fetching Post ######");
      return new Post(postId, "Demo post");
   }

   @CachePut("posts")
   public void updatePost(Post post) {
      // update post
   }

   @CacheEvict("posts")
   public void deleteById(Integer postId) {
     // delete post
   }

}
In order to test that caching is working, hit URL, http://localhost:8080/posts/1 and look at the console. It should print
#### Fetching Post ######
When you hit the same URL again and again, this message will not be printed. This means that the method is not invoked after first time.
Now change the post id and again the message will be printed for the first time.
Note that this is a Spring boot web application and for this to work, you also need to add Spring boot web starter dependency in pom.xml or build.gradle files.
Cache expire time
For configuring a web application with Spring boot, refer this article.
With default Spring boot caching, you cannot set an expiry time or Time To Live for cached data after which the objects will be automatically removed from the cache.
If you want this feature, then use an external cache provider such as ehcache or any of those listed above.
These providers can be configured for auto expiry of cached data.
Hope this article helped you to grasp the basics of Spring boot caching.