What is slice in Go
Slice is another data structure in Go. Slice stores its elements in contiguous or adjacent memory locations. In this section, you will learn about slice in much detail.
A slice is declared using
var keyword followed by its name, square brackets and data type. Keeping it together, the syntax to declare a slice isvar slice_name []data_type
name of slice is user defined.
Notice that the slice declaration does not include its size. This is because a slice may grow or shrink at run time.
Above syntax just declares a slice, it does not contain any elements till now, neither it is created. If you print an only declared slice, it will be nil, since zero value of a slice is nil. Example,
var myslice []int
fmt.Print(myslice)
will print nil.
Initializing slice
For adding elements to a slice, it needs to be initialized. There are 2 ways to initialize a slice.
1. Initialize with explicit values
Create a slice with elements added to it. Its syntax is the same as declaring a slice except that it is followed by the elements of slice enclosed in curly braces. Example,
var myslice = []int{2,3,4}
fmt.Print(myslice)
Above program will print
You can also use short notation while creating a slice. Thus, above syntax can be modified as
myslice := []int{2, 3, 4}Golang provides a built-in function
make function which can be used to create a slice. make accepts following arguments- Data type: Data type of the elements of the slice.
- Length: Number of elements in the slice.
- Capacity: Maximum number of elements that the slice contains. This argument is optional and if not given, its capacity is set equal to its length.
Capacity will be explained in more detail later in this section.
make will return a new slice with the values of its elements set to the zero value of their data type(which is provided as first argument to make).
Example of make used for creating a slice is
// create an integer slice of length 4 and capacity 5
var myslice = make([]int, 4, 5)
fmt.Print(myslice)
This will print
Adding elements to slice
As stated before, a slice is dynamic in that it can grow in size. This means that it is possible to add elements to a slice after it is created.
Golang provides a built-in function append which can be used to add elements to a slice. append accepts two arguments:
- a slice to which it adds values,
- Values to be added to the slice.
You can add any number of values to a slice with a single call to append. This is because the second argument is a variable arguments.
Signature of append is
append(slice T, nums …T)
where T is the data type of the slice and the values that should be added to the slice. Example,
// create a slice
nums := []int{1, 3, 5}
// add to slice
nums = append(nums, 7, 9, 11)
fmt.Println(nums)
This code will print
append creates a new slice, adds elements to it and returns the new slice. Thus, the return value should be assigned to a new slice.
Note that the original slice remains unchanged. Example,
nums := []int{1, 3, 5}
// assign return value to a new slice
nums_appended := append(nums, 7, 9, 11)
fmt.Println("Original slice ",nums)
fmt.Println("Appended slice ",nums_appended)
This code will print
Original slice [1 3 5] Appended slice [1 3 5 7 9 11]
which shows that the slice supplied to append was not changed.
Access slice elements
Elements of a slice are indexed and they can be accessed using integers. Slice index begins at 0 with the index of first element as 0.
For accessing a slice, the slice variable is followed by the index of element enclosed in square brackets. Thus, below syntax will return the first and second elements.
nums := []int{1, 3, 5}
// first slice element
nums[0]
//second slice element
var num = nums[1]
Modifying slice elements
As stated above, slice elements are accessed using their index. Elements of a slice can also be modified using their indexes.
Assign the value to update to the appropriate slice element by accessing its index as shown below. Value to update should be placed at the right side of assignment operator.
nums := []int{1, 3, 5}
fmt.Println("Before:",nums)
// modify second slice element
nums[1] = 10
fmt.Println("After:",nums)
This will print
Before: [1 3 5] After: [1 10 5]
Iterating a slice
A slice can be iterated using a for loop and range expression. Range expression is followed by the slice variable. In every iteration, range expression returns both the index of current slice element and its value as shown below.
// create a slice
nums := []int{1, 3, 5}
// iterate the slice
for index, val := range nums {
   fmt.Println("Index is",index,",Value is",val)
}
Above code prints
Index is 0 ,Value is 1
Index is 1 ,Value is 3
Index is 2 ,Value is 5
If you do not want to use any of the values returned by range expression, then replace it with underscore since unused values are error in Golang. Thus, below example does not use index,
// create a slice
nums := []int{1, 3, 5}
// iterate the slice
for _, val := range nums {
   fmt.Println("Value is",val)
}
Slicing a slice means extracting some elements from a slice. Slicing may also be termed as sub-slicing a slice. A slice is sub-sliced using slice expressions.
A slice expression consists of the name of slice followed by a start index and end index separated by a colon and enclosed between square brackets as below.
slice[initial : end]
where initial is the index of element from which the sub-slice will be created.
end is the position till which you want to slice.
Elements included in sub-slice will begin at initial index of main slice till the element at position end.
When counting, initial will start from 0 since element indexes begin with 0 and end will begin from 1 since element positions begin at 1 as shown below.
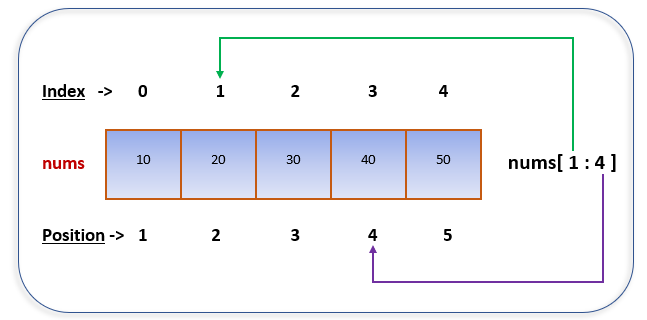
Total number of elements in the sub-slice = (end – initial).
So, elements in sub-slice will be added starting from initial index of main slice till the total number of elements in the sub-slice(end – initial).
Thus,
[1 : 5] will include elements 4 elements starting at index 1 till 5th position(that is, at index 1, 2, 3 and 4)
[2 : 6] will include 4 elements starting at index 2 till 6th position(that is, elements at index 2, 3, 4 and 5)
Example,
nums := []int{1, 3, 5, 7, 9}
fmt.Println(nums[1:3])
This will print
First argument is optional. If omitted, it is considered to be 0.
Second argument is also optional. If omitted, it defaults to the length of slice.
Remember that slicing occurs on a copy of slice, that is, sub-slice is a new slice with the original slice remaining unchanged. Example,
nums := []int{1, 3, 5}
fmt.Println(nums[1:3])
fmt.Println(nums)
Above example creates a sub-slice and prints the new and original slice. Result printed is
You cannot slice a slice beyond its length, that is, second argument can not be greater than the length of the slice. Doing so would result in an error.
runtime error: slice bounds out of range [:4] with capacity 3
where length of slice was 3.
Backing array
A slice is built on top of an array. When a new slice is created, behind the scenes, an array is created and slice is created on top of it. This array is called Backing array.
When you sub-slice a slice, the newly created sub-slice also points to the same array or it also has the same backing array.
Any changes made to the sub-slice also affect the parent slice and vice-versa. Reason is that they both share the same array. Example,
// create a slice
nums := []int{10, 20, 30, 40, 50}
// sub-slice from 1st element to 4th position
less_than_50 := nums[0:4]
// print both of them
fmt.Println("Main slice before:",nums)
fmt.Println("Sub-slice before:",less_than_50)
// modify the last element of sub-slice
less_than_50[3] = 60
fmt.Println("---------------------")
// print again
fmt.Println("Main slice after:",nums)
fmt.Println("Sub-slice after:",less_than_50)
Above example creates a sub-slice from a slice and then modifies an element. This modification is also reflected in main slice. Look at the output.
Main slice before [10 20 30 40 50]
Sub-slice before [10 20 30 40]
———————
Main slice after [10 20 30 60 50]
Sub-slice after [10 20 30 60]
Slice Vs array
A slice is similar to arrays but more flexible and powerful as compared to them. Unlike arrays, size of slice may increase dynamically after creation.
There is a slight difference between the declaration of an array and a slice. Array declaration includes a size while slice declaration does not. Example,
Array declaration: var nums [10]int
Slice declaration: var nums []int
Behind the scenes, a slice is an associated with an array. Slice is more widely used and recommended to be used over arrays.