This article will explain how to use Thymeleaf with a Spring boot MVC web application.
In this tutorial, you will also learn how to create Spring controller for your own URLs and render Thymeleaf templates when these URLs are accessed via browser.
Set up Development environment
Steps for configuring development environment for creating a Spring boot MVC web application that uses Thymeleaf are the same as discussed in creating web application using Spring boot with a single difference.
If you did not go through it, read this first.
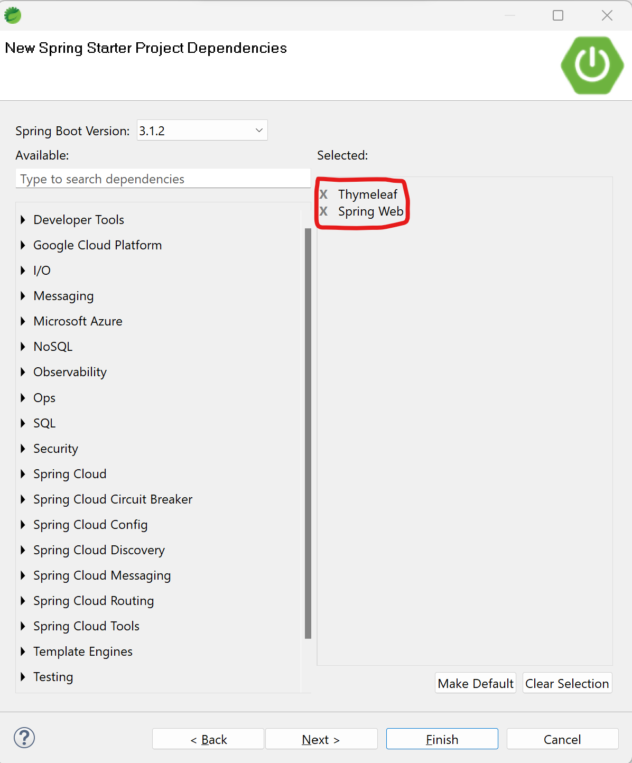
In this article, the only dependency added was Spring Web while creating the project.
Now, since we want to use Thymeleaf also, we need to add its dependency as shown below.

If you have already created the project, you do not need to create a new project for this. Just go to the pom.xml file of your project and add the below dependency.
 Save the file and it will download the required dependencies and add it to the classpath.
[the_ad id=”644″]
Creating Controller
Spring Controllers are java files with @Controller annotation defined above them. Each controller class contains different methods which are invoked when a particular URL is accessed.
Which method will be invoked for what URL, is defined using @RequestMapping annotation. This annotation is followed by a string which is the URL for which this method should be invoked.
Example,
@RequestMapping("/users")
public List<User> getUsers(){
   // code
}
Above method will be invoked when http://localhost:8080/users is accessed.
By default, @RequestMapping maps to HTTP GET request. This can be changed with method attribute as @RequestMapping(value="/users", method=RequestMapping.POST)
If the method supports GET requests, you can also use @GetMapping("/users")
Value returned from the controller can be handled depending upon the view or purpose. View may be an XML, HTML or a JSP.
A controller method may also return these values to a web service client.
For this article, the controller method will map to a Thymeleaf template.
Controller for this article is given below.
package com.codippa.demo;

import org.springframework.stereotype.Controller;
import org.springframework.web.bind.annotation.GetMapping;

@Controller
public class AppController {

  @GetMapping("getmessage")
  public String message() {
    return "message";
  }
}
This controller method will be invoked when I type http://localhost:8080/getmessage and will return a String.
Using Thymeleaf with Spring boot
Thymeleaf works on templates. Templates contain the data that needs to be rendered. Thymeleaf supports XML and HTML templates.
In this article, we will be dealing with HTML templates.
Thymeleaf templates are HTML files with a .html extension obviously.
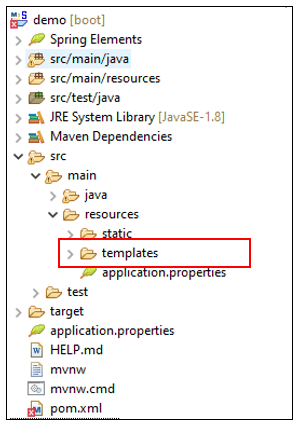
By default, Spring boot looks for template files in src/main/resources/templates folder as highlighted in the image below but you can change Thymeleaf template location as per your needs.

Now you might think the templates folder could contain many files, how would a desired file be picked up.
The answer is
When you access a URL in browser, a corresponding controller method mapped to the URL is invoked which returns a String.
Spring will use this returned String, append .html and look for this file name in the configured template location(default or user defined) and render the template file name matching it.
Thus, if the controller method returns “users”, then a template file with name users.html must be present in the configured template location and it will be displayed by the browser.
Another question that might pop up to you is how does Spring know that it needs to use Thymeleaf and not JSP.
The answer is
Spring boot looks at the classpath, checks that the it contains Thymeleaf dependencies added and no extra configuration has been done by the programmer.
It knows that it needs to use Thymeleaf templates.
Thymeleaf template for this example is as below.
<html>
   <h1>Learning Spring Boot</h1>
   <hr/>
   <h3>Hello World,</h3>
   <h2>This is my first Spring Boot MVC web application</h2>
</html>
Save it as message.html in src/main/resources/templates.
You can learn more on Thymeleaf here.
[the_ad id=”3385″]
Adding welcome file
Create a file index.html in src/main/resources/static. Spring boot looks at this location for static files.
If the name of file is index.html, then it is considered as the welcome file by default and is rendered when application root URL is accessed.
Contents of index.html are as below.
<html>
   <h1>Learning Spring Boot</h1>
   <hr/>
   <a href="getmessage">Get Message</a>
</html>
After creating all the files as discussed above, that is, Controller, message.html and index.html, restart the application.
Now type http://localhost:8080 in the browser, you will get
Click on the link and it will display
Learning Spring Boot
Hello World,
This is my first Spring Boot MVC web application
Control flow: Recap
Following are the sequence of events that take place for a quick and better understanding.
1. When http://localhost:8080 is accessed, Spring looks for index.html file in src/main/resources/static folder and renders it.
This file contains a link that points to a URL “getmessage”. A method with this URL is mapped in the controller class.
2. When the link is clicked, a request is sent to this method and it returns a String “message”.
3. Spring’s view resolver knows that Thymeleaf is configured for this application, it looks for a Thymeleaf template with the name returned from controller at the configured location and returns it to the browser.
4. Since it is written in HTML, the browser displays it as a web page.
Sending data from controller to template
The template we saw above is a static template with pre-defined text. But this can be made dynamic by passing data between the controller and template.
Complete template tutorial is outside the scope of this article and you can learn more about it here.
But here is how you can pass data from controller methods to template. Modified controller method which sends data to template is as below.
package com.codippa.demo;

import org.springframework.stereotype.Controller;
import org.springframework.ui.Model;
import org.springframework.web.bind.annotation.GetMapping;

@Controller
public class AppController {

   @GetMapping("getmessage")
   public String message(Model model) {
     model.addAttribute("user", "codippa");
     model.addAttribute("message", "Sent from controller");
     return "message";
   }
}
where Model is an implicit object provided by Spring.
Think of it as a map where you can set key-value pairs and refer the values in the template using keys.
Modified template is shown below,
<html xmlns:th="http://www.thymeleaf.org">
   <h1>Learning Spring Boot</h1>
   <hr />
   <h3><span th:text="'Howdy, '+${user}"></span></h3>
   <h2 th:text="${message}"></h2>
</html>
where th:text is a thymeleaf directive and value for a key sent from controller is accessed using "${}" syntax.
Output of this template on the browser will be displayed as
Learning Spring Boot
Howdy codippa,
Sent from controller
[the_ad id=”656″]
That is all on Spring boot web application with Thymeleaf. You can now create a sample application on your own.
Feel free to ask for any clarifications in the comment section below.
Hope the article was useful.
