What is a component
A component represents a view on the screen. Everything what we see on the screen is a component.
A single page can be constituted of one component or many components. Also, a component can have child components. Example, a page can have a menu, a header and body. All can be contained in a single component or there can be a menu component, header component and a body component.
Similarly, a single control on a page can be a component or a combination of components. Example, a table on a page can be a single component or it may be a combination of components where a table is a parent component and each of its row is a child component.
[the_ad id=”656″]
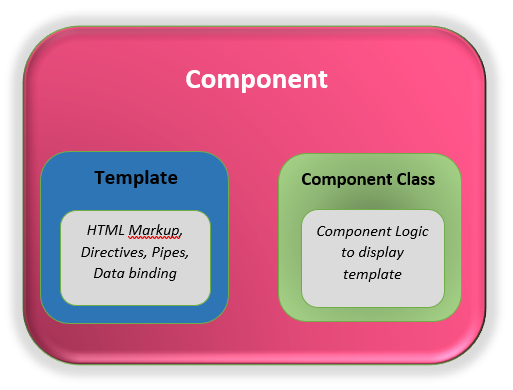
Parts of a component
A component is composed of 2 parts, a view which is an HTML markup and a component class. In order to render the view, both these parts go hand in hand.
Template : Since a component represents a view and in web applications, view is HTML. Thus, this part of a component is an HTML template. It has access to fields and methods of the underlying component class and supports data and event binding. Elements can be formatted using directives and pipes. HTML template of component can be defined over the top of the component class or in a separate file. For simple views, template over the class can be used but for practical applications, the template is a separate file.
Component class : A class which contains logic that controls how the view will be rendered. It contains code which is written as per application requirement. It contains properties and methods just like classes in Object Oriented languages such as Java, C# etc. The component class is written in typescript and in annotated with @Component annotation.
Following points should be noted about a component class:
a. It is written in typescript.
b. The class can have methods and variables just like a class in Object Oriented languages such as Java, C++, C# etc.
c. Typescript classes follow Object Oriented concepts such as Inheritance, Polymorphism etc.
[the_ad id=”644″]
Syntax of component
A component is a typescript class which is annotated with @Component annotation. This annotation also specifies a metadata for the class. Metadata contains different attributes of this component in key-value format. Following are the commonly used attributes of component metadata:
- The selector which is a custom HTML tag representing this component. The key for this attribute is selector.
Example, suppose the selector attribute of a component has the value ‘<codippa>’. Now, if an HTML in the application has a tag ‘<codippa>’, then the view of the component matching this selector value is inserted in place of this tag. - HTML template for this component. The key for this attribute is template and value is the HTML markup which will be the view of this component.
- Path of HTML template file. The key for this attribute is templateUrl. Note that either template or templateUrls can be used. Both cannot be used together.
- Path of css files used for styling of HTML view. The key for this attribute is styleUrls. Value is an array and thus can have multiple comma separated css file paths.
- Array of services which are required by this component. The key for declaring services required by a component is providers. A service is also a typescript class. Angular creates an object of the service given in the providers array and injects it into the variables.
Usage Example
A typical example of an angular component class is as below:
selector : ‘<codippa>’,
templateUrl : ‘./codippa.component.html’,
providers : [ CodippaService ] })
export class CodippaComponent {
// component code
}
Above component has the selector ‘<codippa>’ and its HTML template is given in the file ‘codippa.component.html’ file. The component declares that is will use CodippaService.
So, tag ‘<codippa>’ found anywhere in the application will be replaced by the the HTML markup given in the template file. Note that the template file is placed in the same directory as the component class file.
[the_ad id=”647″]
Suppose, the HTML template file for the component is as below:
<h1> This is HTML template for codippa component</h1>
Now, let’s say there is another component whose HTML is as below:
<html>
<body>
<h1> This is HTML template</h1>
<codippa></codippa>
</body>
</html>
When the above HTML will be rendered, Angular will check the custom tag ‘<codippa>’ to be matching with the selector of CodippaComponent and replace the HTML template of this component with this tag. So, the resulting HTML will become
<html>
<body>
<h1> This is HTML template</h1>
<h1> This is HTML template for codippa component</h1>
</body>
</html>
How to generate Component
Any class annotated with @Component annotation is a component class. Thus in order to create a component, just create a class and annotate is with @Component and supply required metadata. But, there are a couple of hassles involved. You need to write all the annotations and metadata values yourself. Secondly, a component has a template and may have a css file associated with it. If you create a component manually, then you need to create these files too.
[AdSense-A]
Fortunately, angular cli provides a utility using which you can generate a component automatically. In order to create a component, open command prompt, navigate to the folder in which you want to generate the component and execute command
ng generate component [componentname]
Once the command is executed, angular cli generates
- Component class file with a .ts extension.
- Component template file with .html extension.
- Component css file with .css extension.
- Component spec file with .spec.ts extension. This is the file used for writing unit test cases related to this component

Besides generating the above files, angular cli also updates the related module file and imports it into the module so that this component becomes part of the module.
There is a short command for generating a component. It produces the same result as the above command.
ng g c [componentname]
g is the short name for generate and c is the short name for component.
Please note the naming convention of the files. All component files are named as [componentname].component.[extension]
[AdSense-B]
Life cycle methods of component
Every component has a life cycle which is managed by Angular. These life cycle hooks are executed at various stages of component rendering. Example, at the initialization of component, at change of component field values, after component is initialized, when component is destroyed and so on. A lifecycle hook is represented by a method with a predefined signature. All life cycle methods are prefixed with ng. Methods will only work when the component class will implement the related interface.
Following are the important lifecycle methods.
| Method | Description | Called | Interface to implement |
|---|---|---|---|
| ngOnChanges() | Called everytime when there is a change in the properties of a component which are annotated with @Input |
Called before ngOnInit method |
OnChanges |
| ngOnInit() | Called after the component’s properties are initialized. | Called only once after the first ngOnChanges |
OnInit |
| ngDoCheck() | Called everytime when a component is reloaded after any change. | Called after ngOnInit |
DoCheck |
| ngAfterContentInit() | Called after the content from other components(usually child components) is inserted into a component HTML or after content projection. | Called once after ngDoCheck |
AfterContentInit |
| ngAfterContentChecked() | Called after the above content has been checked by Angular | Called after ngAfterContentInit and after every ngDoCheck |
AfterContentChecked |
| ngAfterViewInit() | Called when the views of a component and its child components have been initialized. | Called after ngContentChecked |
AfterViewInit |
| ngAfterViewChecked() | As the name suggests, this method is called when component and child views have been checked | Called after ngAfterViewInit and after every ngAfterContentChecked |
AfterViewChecked |
| ngOnDestroy() | Cleans up the component. Called when the component is removed from the screen usually when the page is changed. | Called just before the component is destroyed. | OnDestroy |
Out of all the above methods, the most commonly used methods are ngOnInit and ngOnDestroy. Note that methods names match with the interface names with ng prefixed to the interface names.
[AdSense-C]
Component Constructor
A component is initialized using a constructor. In order to supply a constructor to a component, constructor keyword is used. Note that the constructor is mandatory when you need to pass some arguments to a constructor such as the services which the component requires. If there is no constructor, then Angular implicitly generates a no-arg constructor for the component.
A component can also implement an interface using implements keyword. If a component implements an interface, then it should also implement all the methods declared in that interface.
Inheritance in Components
A component can be extended by another component using extends keyword. When a component extends another component, then it can access all the non-private fields and methods of the parent or extended component. Note that if the child component has a constructor, then the first line in the constructor must be a super keyword which calls the parent class constructor. If it is not, then there will be the following error:
Constructors for derived classes must contain a ‘super’ call.
Syntax for creating a child component alongwith a constructor is
@Component({
selector : ‘<child>’,
templateUrl : ‘./child.component.html’,
})
export class ChildComponent extends ParentComponent {
constructor() {
// call parent class constructor
super();
}
}
Let’s Summarize
Key points from this post are extracted below.
- A component is composed of a component class and an HTML template.
- A component is a typescript class annotated with
@Componentannotation. @Componentannotation contains metadata which defines the selector, template file, css file for this component and the services required by this component.- When the selector of a component is used inside the HTML template of another component, then the HTML from the template of source component is replaced with the selector in the target component template.
- If a component A’s selector is used inside HTML template of another component(say, component B), then component A should be imported in component B.
- The services required by a component can also be defined at the module of this component.
- A component can be easily generated using angular cli using command ng g c [componentname].
- Angular component has various life cycle methods which are implicitly called at different stages. A component is required to implement a corresponding interface for a life cycle method to work.
- A component can extend another component using
extendskeyword and implement an interface usingimplementskeyword. - If a component has a constructor and it extends another component, then the first line the constructor should be a
supercall to parent component constructor. - This post is written as per Angular 4+ syntax.