Forms

Forms are the most important part of every application. Be it a hospital management web application, school management desktop software, website with user registrations, gmail, a mobile gaming app asking for email and user name etc., forms are everywhere.
[the_ad id=”94″] An HTML form contains elements such as text box, checkbox, radio buttons, drop downs embedded inside form tag. A form once filled by the user is submitted to the server where the all the data is sent to the server. For better understanding, let us create a form first.

<form>
     <label>Enter name: </label>
     <input type="text" name="name" /><p/>
     <label>Enter age: </label>
     <input type="text" name="age" /><p/>
     <label>Select technology: </label>
     <select>
         <option value="react">React</option>
         <option value="angular">Angular</option>
         <option value="vue">Vue</option>
     </select><p/>
     <button type="submit">Submit</button>
 </form>

Above form has 2  input fields, drop down and a submit button.
React forms
Above form when submitted sends data to the server and navigates to a new page but since most react applications are Single Page Applications, we need some mechanism that when the form is submitted, the control still remains on the same page.
For this, it is better to create a function that is called when the form is submitted. This function has access to all the elements of the form and their values. Generally, react component’s state object is synchronized with form element values. As each form element’s value changes, the state object is updated using setState method so that at any time the state object contains updated values of form elements. When the form is submitted, the state object can directly be accessed and sent to the server. HTTP calls that we learnt in the last section are utilized for this.
Also, each element should have a handler function associated with it so that when its value changes, it directly updates the state object.
[the_ad id=”95″] With these changes, the modified form will look like.

import React, { Component } from 'react';
import ReactDOM from 'react-dom';

class FormComponent extends Component {
    // state object
    state = {
        name: null,
        age: null,
        technology: 'react'
    }

    // handler function for name 
    nameChange = (event) => {
        this.setState({name:event.target.value})
    }

    // handler function for age
    ageChange = (event) => {
        this.setState({age:event.target.value})
    }

    // handler function for technology
    technologyChange = (event) => {
        this.setState({technology:event.target.value})
    }
    
    // submit function
    formSubmit = (event) => {
        event.preventDefault();
        console.log(this.state);
    }

    render() {
        return (
            <form onSubmit = {this.formSubmit}>
                <label>Enter name: </label>
                <input type="text" name="name" 
                       onChange={this.nameChange} /><p/>
                <label>Enter age: </label>
                <input type="text" name="age" 
                       onChange={this.ageChange} /><p/>
                <label>Select technology: </label>
                <select value={this.state.technology} 
                       onChange={this.technologyChange}>
                    <option value="react">React</option>
                    <option value="python">Python</option>
                    <option value="vue">Vue</option>
                </select><p/>
                <button type="submit">Submit</button>
            </form>
        );
    }
}
ReactDOM.render(<FormComponent/>, document.getElementById('root'));

Every form element has a corresponding handler function which updates the state object with its current value. You should be using a common handler function for all the elements. Also note that the keys of state object match the name attribute of form elements. This is not required in this case since we are using custom function to submit the form.
[the_ad id=”89″] The form itself has a submit handler function. Note the preventDefault function inside the form submit function. It prevents the default action of submit event which is refreshing the page so that the control remains on the same page. In this example, we are just logging the form to the console but in real world applications, the object is sent to the server for saving it to the database.
It is not mandatory to use the component’s state object to contain the form element values, you can use any object and update it. But using state object gives you the ease of updating element values using setState method. This becomes pretty convenient when the form is complex and contains nested elements. In these cases, the corresponding object also becomes complex.
When the form is submitted, following is the output on the console. You can guess the values entered.

{name: “Mark Twain”, age: “30”, technology: “react”}
     age30
     nameMark Twain
     technologyreact

select Tag
The HTML select tag is used to create a drop down of options. A normal select tag is created as below.

<select>
   <option value="react">React</option>
   <option value="python" selected>Python</option>
   <option value="vue">Vue</option>
</select>

Note that second option has a selected attribute. This makes the second option appear as selected when the drop down is rendered.
In react, there is no selected attribute, it instead uses a value attribute directly on the select tag. Option whose value matches the select tag’s value is shown selected.
In our example, note that we have set the select tag’s value to the technology attribute of the state object whose default value is react. Thus, when the form is rendered, react option appears to be selected.

For multiple select boxes, you need to pass an array to its value and set its multiple attribute to true as
<select multiple={true} value={[‘python‘, ‘react‘]}>
[the_ad id=”267″] Checkbox
A checkbox is different in that it does not have a value attribute but has 2 states checked or unchecked. In order to determine whether a checkbox is checked or not, we can use the checked property from event.target of its handler function. This property will return true if the checkbox is checked false otherwise as shown below.
state = {
   updates: false
}

checkBoxHandler = (event) => {
   this.setState({updates: event.target.checked})
}

<input type="checkbox" onChange={this.checkBoxHandler} />

For any queries/doubts/additions, comment in the section below.
Forms

Forms are an integral part of any web application and are used for interacting with user. They are mainly used to capture user input from the browser and send it to the application for further processing. Forms serve various purposes such as a login form, signup form, flight booking form, student registration form and many more.
An HTML form is created using <form> tag and can contain different controls which are used for user interaction such as a text box, text area, radio button, check box and drop down. When a form is submitted the values of all controls inside the form is sent to desired URL at the server where it may be saved to the database or processed further. Example, when submitting a student registration form, student details are submitted to the database and when submitting a ticket booking form, details from the form such as passenger names, number of seats, departure and arrival dates etc., are extracted to reserve the tickets.

[the_ad id=”89″]

Angular Forms
Angular provides support for forms. Each control in a form is represented by a class called FormControl. Thus, if a form contains a text box, a radio button and a checkbox, then there will a FormControl instance for each of them.
There are 2 approaches to create FormControl objects for form components in Angular and based on these approaches, Angular forms can be divided into following 2 types:
1. Template Driven Forms
In this type of form, certain directives are applied to form components inside the HTML template and angular creates their FormControl instances automatically behind the scenes. Thus, this type of form is driven by the HTML template of a component.
2. Reactive Forms
In this type of form, FormControl instances for form components are explicitly created inside the component(or typescript) class of a component. That is, you need to manually write code for creating FormControl objects for all form components. This type of form is driven by the component class of a component.

Template Vs Reactive Forms
You might be wondering which form should be used in an application. This depends on the requirement for which a form is used but knowing the differences between the two will surely help to decide. Following are the key differences between the two.

[the_ad id=”94″]

Reactive Template
These require more coding as compared to template form. This requires less coding.
With this type of form, you have can perform validation of the form in a better way. You cannot have much control over form validation.
Since most of the code for this form is written in typescript class, it is easily to write unit test cases for the form. Since most of it is written in HTML, it is harder to unit test this type of form.
This form is best suited for complex forms such as a form which contains dynamically added components. Example, a ticket booking form on which passengers are added dynamically. This form is suitable only for simple forms such as a login form, registration form etc.

Based on the above differences, it is clear that where simple forms are required with simple validations, it is better to choose template driven approach while for complex and dynamic forms, go with reactive forms. Both of these are discussed in detail further.

[the_ad id=”94″]

FormControl
Every element in a form, be it a text box, a checkbox, a radio button etc., is represented by an instance(or object) of FormControl class in angular. This object contains useful information about the form element such as its value, whether this element has been focused, its value has changed after page load, value entered is valid or not(as per the validations applied to it).

FormControl class exists in forms package and can be imported as import { FormControl } from ‘@angular/forms’

Following are the fields in a FormControl instance which are used for determining the state of the form element associated with it.
1. value: This field contains the value of the form element. Thus if the element is a text box, then this field will contain the value typed into it. If it is a checkbox and it is checked, value will be true else false.
2. dirty: This field will be either true or false depending on whether its value has changed after the form was loaded. At the time a form is first loaded value of dirty field for all form elements(or FormControls) will be false. As you type something inside a text box or click a check box, its dirty field will become true.
3. pristine: This field is opposite of dirty and marks if the form control is clean. It will be true if the value of form element has not been changed after the form was loaded, false otherwise.
4. touched: This attribute can have values of true or false. If the form element is focused after the form loaded, this field becomes true. Thus, if you click on a text box and then move to another field, this value will become true.
5. untouched: It is the opposite of touched field and will be true till a form element has not been focused. untouched attribute of all form elements will be true when the form is first loaded.
6. valid: This field comes into play when validations are applied to a form element. If the value of the form element passes all the validations applied to it, then this field remains true. Example, if a validation for a valid email is applied on a field and user does not enter a correct email format, then as soon as the input box loses focus, valid attribute will become false. If no validations are applied on the form element, then this field remains true.
7. invalid: Opposite of valid. It becomes false if the value of form element passes all validations. If no validations have been applied on a form control, this field remains false.

Form controls for form elements can also be created programmatically. This is what is done while creating Reactive forms and will be discussed in detail under Reactive Forms section.
[the_ad id=”96″]

FormGroup
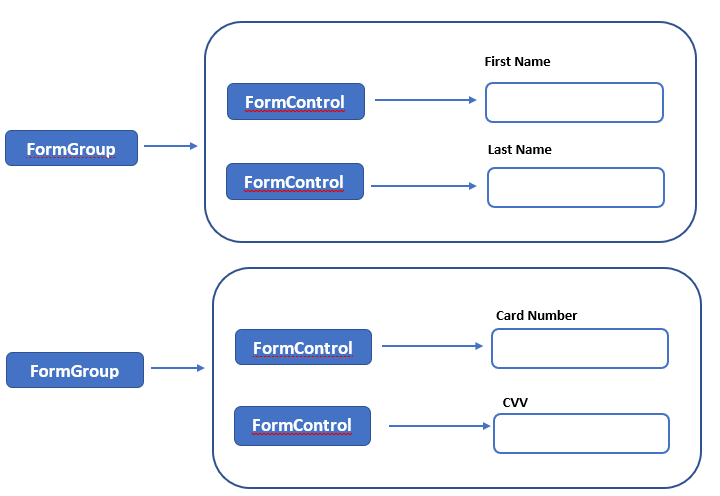
A FormGroup is a collection of form elements or a collection of FormControl objects. FormGroups are commonly utilized when:
1. Form elements need to be categorized. Example, a form containing fields for first name, last name, address can be categorized into contact information form group while controls for payment related information such as card number, expiry date and CVV in same form can be put under payment form group etc.
2. Form spanning across multiple tabs or pages where controls on each tab/page can be put under one form group.
3. Form with dynamically added elements or FormControl object where dynamically added FormControl objects are added to parent FormGroup object.

Below illustration will make the concept of FormControl and FormGroup and how they are related to each other and to form elements more clear.

FormGroup and FormControl objects

All the properties discussed above that are present in a FormControl object(such as dirty, pristine, touched etc.) are also present in a FormGroup instance but in this case their values are a combination of the values of its FormControl objects. Example, if a FormGroup object contains 2 form elements each having its own FormControl instance and the value of valid property of one element in true and other one is false, then the value of valid property of FormGroup object will be false.

Exit mobile version